How To Get Rid of Stains With Tie Dye DIY
In this post I will tell you how get rid of stains on clothes with tie dye DIY. But first, a story!
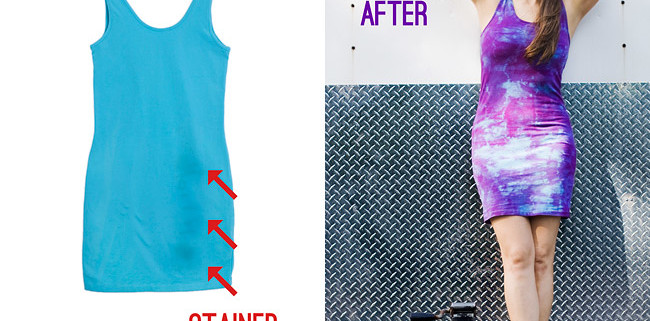
I had a dress of amazingly beautiful turquoise colour. One day I wore it to work. I was sitting at my desk and drinking tea, and then I accidentally spilled tea on my lap… and my beautiful dress got covered with tea stains 🙁 I rushed to the bathroom and splashed as much water on the stains as I could, but it did not work. At home I tried to wash it with a stain remover, and it did not work either… My dress was ruined!
Or was it?
A while ago I found a DIY blog post about what to do with kids clothing that got stained. The mom who wrote the post was saying that her trick was to dye the garments. I found it brilliant! I am no longer a child (you know, for the last 30-35 years), but I do stain my clothes all the time!
Dying, that was exactly what I was going to do with my ruined dress. Well, speaking more precisely, I was going to do tie-dying, because simple dying is boooring!
Here is what I had and what I got.
Ok, ok, you are right. I did not removed tea stains for real. But! I definitely hid them well 😉 Not only I saved the ruined dress, I also turned it into a trendy piece. Tie dye dresses are currently huge!
While writing the instruction part, I realized that it is very similar to what I wrote a while ago in the post DIY: Pink Tie Dye Shirt or How I Turned My Failed DIY Into Successful One. Oh well. I will keep this one, but in future I will avoid repeating myself 🙂
Tie-Dye DIY Instructions
Sooooooo, to do a tie dye DIY you will need:
- DYLON fabric dye for hand use; chose the colour that will give a nice shade once mixed with the original colour of the garment (I chose Flamingo Pink)
- salt to mix with the dye according to the instructions (not pictured)
- rubber bands
- a metal bow big enough to hold your garment
Fold your garment in layers like an accordion.
Make the folds even. Your folded garment should look like a long evenly thick sausage 🙂
Important: Try to tie the garment in such way that the stains are not hidden inside. Otherwise you will not be able to dye them.
Then tie the sausage with rubber bands!
Now mix the dye in the bowl according to the instructions and put the garment inside. You won’t probably need to use the whole packet; a half will be enough. At least I used only a half, and later I was very glad I did not use it all. You will see.
Choose the dying time according to the instructions.
No need to stir it during the dying. Just flip it once after half the time is passed.
Take off the bands. Wash the garment to remove the excessive dye.
Uh-oh! The stains are still here! Now… look at the stains that did not disappear because they were folded inside the tied item…
…and repeat the process all over again 🙂 This time fold it in the opposite direction. Also, now is the time to use the half of the dye packet you saved earlier!
As you can see, I had to repeat the dying process one more time.
The next picture shows the dying stages my dress went through. I like better the pattern that came out after the first dying. However, I missed the stains, and it did not leave me the other choice but re-dying it.
Tie-Dye DIY Result
Viola – here comes my saved dress! Even prettier than before.
The shoes were lent to me by the amazing store Fripe Fabrique 😉
Traditional DIY Before And After picture!
As you can see, it is pretty easy to get rid of stains by tie dying the garment. No more frustration! Only pure fun!
Disclaimer: Yup, this post may contain affiliate links! If you buy something from me, I get some margarita money (not enough to buy a pair of shoes). Read more here.


Well, this made my day. I have a strangely stained shirt that i can’t wear, but don’t want to throw away, and i did not think of this for some reason. Awesome!
thanks! I am so glad it is helpful! 🙂
I love any reason to tie-dye and this came out awesome! Thanks for posting 🙂 http://trend-mixblog.com/
thanks 🙂
Perfect answer to the stained dress. I like it better now. Jo @ Let’s Face the Music
thanks Jo!
This is the secret to life: when you screw up, screw up classier and then say you planned it all along. Half the compliments I get on sewing projects are a result of following this rule. Because super wide leg pants.
Yep, that’s the spirit! Faults should be embraced and used as a creative guidance.
Your comment is great, but I did not get the super wide leg pants part…
Oh, I had a pair of outdated stonewashed jeans that tapered unflatteringly so I took it in the other direction and inserted side panels of heavy floral decorator fabric to turn them into super-wide-leg-flares.
They’ve produced several requests, offers, and one guy even wrote a piece of music after being inspired by them. He wrote a song to my pants! (That sounds bad but my pants don’t care.)
I see 🙂
ahaha, looks like your pants made a big splash 🙂 I love stories like this. Do you have a picture of the pants by any chance?
It’s basically the concept below except I flared it farther and took it all the way up to the waistband to make wide leg jeans.
https://www.google.com/search?q=turn+jeans+into+bell+bottoms&rlz=1C1VEAD_enUS472US472&espv=2&biw=1344&bih=734&source=lnms&tbm=isch&sa=X&ei=Tg0FVcH3IY63ogSN9oCABA&ved=0CAcQ_AUoAg#imgdii=_&imgrc=mWxXWX2VenHI0M%253A%3BLCvDUNmGI8kUNM%3Bhttps%253A%252F%252Fs-media-cache-ak0.pinimg.com%252F236x%252F66%252Fe5%252F4b%252F66e54ba7329debc590b8ab67bc2b257e.jpg%3Bhttps%253A%252F%252Fwww.pinterest.com%252Fexplore%252Fbell-bottom-pants%252F%3B236%3B314
I see! In the Goolge search I can see some pants that probably look like yours. That indeed looks nice.