DIY: Pink Tie Dye Shirt or How I Turned My Failed DIY Into Successful One
When reading about some DIY, everything looks so easy… And it is! However, sometimes things do not work out as planned. The chemical may be way too stronger than you expect, you may leave it in for too long… or your boyfriend may interrupt and ask for an unscheduled kiss! Something may easily go wrong.
Today I want to tell you a story of the shirt I was wearing while posing with the cat. It is about one DIY failure of mine and how I turned it into success!

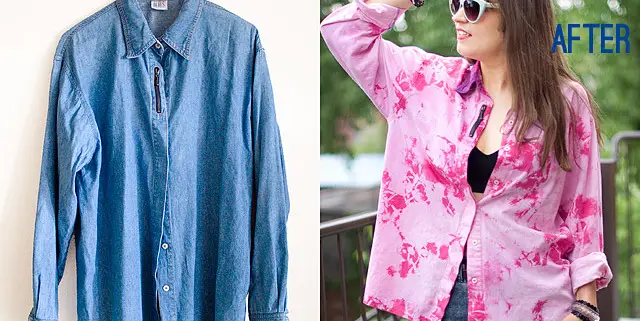
I bought this denim shirt in a secondhand store planning to turn it into yet another tie-dye bleached garment which I like so much.
I started bleaching the shirt as usual preparing to wait for half an hour. However, this time the process went way too fast, ans the shirt was changing the color before my very eyes!
That’s what I got after ten minutes of bleaching: Almost a completely white shirt! Uh-oh!
What can be done with a white shirt?.. Of course, it can be dyed!
I bought a Dylon fabric dye “Flamingo Pink”. This dye is very convenient, because it works in a warm water. In addition to the dye, I only needed a metal bowl and a bunch of rubber bands to make my favorite tied pattern. And of course some regular salt.
The original picture got lost, so I cannot show you how I tied the shirt. I can just say I used the instructions from the Dylon web site (PROJECT A).
While dyeing, I did not stir the water in the bowl. I flipped the item only once after first 30 min. Total dyeing time was 60 min as it was said in the instructions.
This is what I got after dyeing. The shirt was tied too tightly, and the dye did not penetrate fully into the garment. The resulting pattern turned out to be too bright for me…
So I decided to dye it again!
This time my goal was to achieve pale pink with some whitish stains here and there. For that I tied only certain spots leaving the rest of the shirt loose.
I took only 1/4 of the original dye bag. It required 1/4 of the regular amount of salt and the same amount of water. Very easy!
It worked perfectly well! The shirt got a nice peony color with bright pink spots and delicate white ones!
Love my new shirt very much! It turned out to look even more interesting that a regular bleached shirt 🙂
Sometimes failures really come in handy 😉
The main lesson learned: Do not afraid to experiment! The results may be more exciting than you think 😉
I plan to make another shirt like this for my boyfriend. He loved the pattern I got after the first dyeing! His appreciation makes me super happy 🙂
Disclaimer: Yup, this post may contain affiliate links! If you buy something from me, I get some margarita money (not enough to buy a pair of shoes). Read more here.


Trackbacks & Pingbacks
[…] instruction part, I realized that it is very similar to what I wrote a while ago in the post DIY: Pink Tie Dye Shirt or How I Turned My Failed DIY Into Successful One. Oh well. I will keep this one, but in future I will avoid repeating myself […]
[…] colour. Well, I though, summer is here and an extra pair of shorts will come in handy. Let’s again turn a failed DIY into success! That’s how I made these distressed denim cut off […]
[…] you remember my tie-dye pink shirt? Here comes its sequel! Meet my new doily-embellished DIY […]
Leave a Reply
Want to join the discussion?Feel free to contribute!